
building a dobsonian telescope - telescope tube
 |
|||||||||||||||||||
VIDEO QUICKLINKS
"Making the Spider Video"
Time (1:54)
"Tailgate"
Time (1:57)
"Focal Length of Mirror "
Time (1:30)
"Mounting Blocks"
Time (1:35)
There are three parts to the finished telescope:
-
Telescope Tube
- Making the spider
- Eyepiece Holder
- Making the Tailgate - Rocker Box/Ground Board
- Tube Box
- Inserting Mounting Blocks
- Finding Focal Length of Mirror
- Positioning Eyepiece and Spider
- Using the Telescope
The Tube Box and Rocker Box will need to be complete before you go to school. You will also need to prefabricate part of the Telescope Tube as well
Telescope Tube
You will only partially construct the Telescope Tube before
going to the school. The telescope tube has an eyepiece holder, a spider
(to hold the secondary mirror at the front end of the tube), a tailgate
that holds the primary mirror at the back of the tube, and mounting blocks.
|
"Making the Spider Video" (.mov) |
Making the spider
You will need the following for preconstruction:
- a dowel with one end cut at a 45 degree angle and three grooves cut at equal (120 degree) intervals about 1/4" deep
- 3 cedar shims
- 3 pieces of leather scrap 1/2" square
- secondary mirror
- wood glue
- Insert the thin end of the shim
into the groove in the dowel and slide the shim back (so that the
part in the groove is getting progressively thicker) at an
angle until the shim is snug. Mark the thin ends of the shims where
they fit snugly into the grooves of the dowel.
- Carefully cut the shim where you marked it. Insert it into the
groove and glue it to the dowel. Repeat with the other two shims.
- Arrange the three pieces of leather scrap in a triangle on the slant cut end of the dowel. Place them evenly between the grooves and glue in place. Let dry.
Glue the back of the mirror to the leather pads. Make sure the
mirror is centered on the dowel. DO NOT REMOVE THE PROTECTIVE
COVERING ON THE MIRROR! The mirror should be kept level while the
glue dries so prop it up until the glue is set.
At this point the spider is too big for the sono tube. The shims
need to be trimmed to fit inside the tube. The rest of the spider
will be completed at the school. You will have the high school
students determine how to center the spider in the sonotube. They
will saw off the ends of the shims and glue the spider in place. It
is VERY important that the spider be carefully centered in the tube.
Have groups double check each other's work BEFORE cutting the shims.
A common mistake is to measure the external diameter of the sonotube
and cut the shims to fit that. This makes the shims too long but so
close to the actual length needed that trimming is difficult. Make
sure students measure the inside diameter of the sonotube and
carefully measure the diameter of the spider. You could have them
make a paper template with a compass. The high school students will
also determine where the spider will go in the sonotube.
Back to top
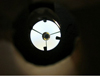
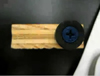
Eyepiece Holder
You will need the following:
- cardboard tube
- 3" x 4" piece of masonite with 1.5" diameter hole cut in the center
- glue
1. Glue the cardboard tube to the
masonite. Make sure the cardboard gets wet with glue.
2. The brass tube should fit snugly inside the cardboard tube and
should slide back and forth fairly easily. If the fitting is too
tight, remove some of the cardboard from the inside of the tube. If
it is too loose, glue strips of cardboard inside the tube until you
have a snug fit. You can also use a hose clamp to tighten the tube.
Back to top
|
"Tailgate" (.mov) |
Making the Tailgate
You will need the following:
- 8" square piece of plywood
- three 5/16" bolts
- cereal box cardboard
- three 1" square pieces of masonite
- compass
- saw
- socket wrench
- drill with 1/4" bit
- glue
- 2 thumbtacks
- Find the center of the 8" square.
Set the compass for the radius of the inside of the sonotube (not
the radius of the mirror which is 6"). Draw a circle with the
compass point at the center of the tailgate. Only the very corners
of the wood will be touched by the pencil.
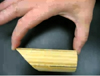
- Saw off the corners of the tailgate at the pencil marks. Now the
Tailgate should fit inside the telescope tube. (plane or sand to fit
if necessary).
- Draw a 4" diameter circle for the placement of the tailgate
bolts.
- Divide the circle into 6 equal segments and mark each of the six
points.
- Choose three of the six marks (every other one) for the
equilateral triangle. We want two of the three marks to be towards
the cut off corners.
- Use a 1/4" drill bit and drill holes at the three corners of the
triangle.
- Screw in the tailgate bolts with a socket wrench. The bolts
should be threaded right through the wood.
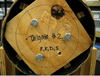
- Turn the tailgate over. Cut a piece of thin cardboard (e.g.,
cereal box) into a triangle which will cover the protruding bolts.
The cardboard should cover all three bolts where they come through
the wood.
- Apply glue to the center of the cardboard only and glue to the
tailgate so the bolts are covered. Let the glue dry.
- Apply glue to the top of cardboard at the three places where the
bolts poke through the wood. Glue the squares of masonite to the
cardboard directly over the bolts. The cardboard protects the mirror
from the tailgate bolts if the telescope is dropped. This cardboard
must be floppy (i.e., ends over bolts loose) so that the objective
can be aligned.
- Fix the position of the cardboard with two thumbtacks.
Mark the top on outside of tailgate. The bottom of the tailgate is the side where the two bolts line up with the two sawed-off corners.
home | field activities | semester project | course information