|
VIDEO QUICKLINKS
"Making the Spider Video"
Time (1:54)
"Tailgate"
Time (1:57)
"Focal Length of Mirror "
Time (1:30)
"Mounting Blocks"
Time (1:35)
|
There are three parts to
the finished telescope:
The Tube Box and Rocker Box will need
to be complete before you go to school. You will also
need to prefabricate part of the Telescope Tube as well.
Rocker Box and Ground
Board Construction
The Rocker Box is the bottom-most piece and holds the telescope so
that it can be rotated and directed at the proper viewing angles. It
will need to be entirely prefabricated BEFORE you go to the school.
You will need the following parts for the Rocker Box:
-
7 part C boards (12.5"x13.75")
-
3 part D boards (1.5" x 1.5")
-
1 vinyl record or 12" diameter
piece of laminate
-
3 small squares of Teflon or
laminate
-
2" nails
-
6 screws
-
3 finish nails
-
1/2" bolt with washer
-
wood glue
-
drill, 5/16" bit, 1/2" bit,
small bits for pilot holes for screws, driver bit for screws
-
hammer
-
socket wrench
-
wood glue
-
pen or pencil
-
straight edge
-
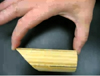
Glue two part C boards
together to form a single board that has double thickness and set aside
to dry. If you wish, you can put screws in the four corners to further
stabilize the double-thick boards. (If you do this, put the screws
several inches away from the edges so you do not interfere with
installing the feet or sideboards later). Repeat this with two more
boards. These double-thick boards will form the bottom of the base and
and box.
-
Before continuing it is VERY important to determine the EXACT
position of the side boards. Failure to do this may result in the tube
box not fitting (which makes the rocker box inoperable).
Measure the width of the tube box excluding the circles.
The Tube Box will sit inside the Rocker Box on two cradle boards
(rectangular boards with half circles cut out of one end). The cradle
boards are 0.75" in thickness and you need 0.125" clearance on each
side.
Use this formula for determining the space between the side boards of
the Rocker Box.
Width of Tube box + width of two cradle boards + 0.25" clearance =
Width of Tube box + 1.75"
-
Obtain one double thick board you made in step 1 and the three
remaining part C boards. The double-thick board will become the bottom
of the box. Two of the part C boards will be placed tall side up to make
the sides of the box and one will be laid short side up to make the
front. Mark the exact positions of the side boards on the bottom board.
Place one side board along the short side (12.5") of the bottom board
and mark the INSIDE edge. Measure the distance determined in step 2 from
the line you just made and mark it with a line. This will be the INSIDE
edge of the other side board.
-
Place one side board so that the short edge (12.5") is on the bottom
board. The board will be taller than it is wide. Apply a bead of wood
glue to the bottom edge of the sideboard and front board. Position this
piece on the bottom board so that the INSIDE edge of the sideboard lines
up exactly with the mark you made and is flush with the front side of
the box. CAREFULLY drill pilot holes at about a 45 degree angle through
the sideboard and into the bottom board. The easiest way to do this is
to begin drilling at a 90 degree angle just enough to make a dent.
REMOVE the drill bit and put at a 45 degree angle into the dent and
drill.
DO NOT TRY TO CHANGE FROM A 90 DEGREE ANGLE TO A 45 DEGREE ANGLE WITH
THE BIT IN THE WOOD!! YOU WILL BREAK THE BIT!
Screw the sideboard to the bottom board being VERY careful not to shift
it away from the mark you made.
-
Repeat this with the other side board. It is a good idea to double
check to be sure the tube box will fit with 1/8" clearance at this
point.
-
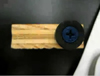
Turn the rocker box so that the back side is on the table and the
front is facing you. place the front board (part C) so that the long
side is flush with the bottom of the bottom board. Mark where the front
board ends on the side boards. Place a bead of glue on side boards and
bottom board. Nail front board to the side boards.
The finished top of the rocker box should look like this.
-
Make the Ground Board. Obtain one double-thick board you prepared in
step 1 and three feet (Part D). Place a small amount of wood glue on
each foot and position the feet as shown. Nail each foot to the ground
board.
-
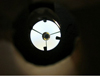
Turn the ground board over so that the feet are on the bottom. Find
and mark the center of the ground board. Drill a 5/16" hole 1" forward
of the center (toward the side with 2 feet).
Be VERY CAREFUL to make sure this hole is exactly perpendicular to the
board (use the levels on the drill and have a friend site this for you).
-
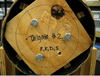
Position the ground board so that the feet are down and the top is
facing you. Use finish nails (small heads) to nail three squares of
Teflon in a circle at three angles of an equilateral triangle about half
way between the hole you just drilled and the feet. If you do not have
Teflon, you can use a small square of glossy Formica. Use a nail set to
inset the nail heads. The vinyl record will ride on these squares so
make sure the squares don't extend past the edge of the record.
-
Turn Rocker box upside down. Place the ground board on top of the
upside down rocker box. Orient so the sides are flush with each other.
The front board of the rocker box will hang over a little bit. Position
the ground board so that it is 3/16" back from the edge of the front
board (this will split the difference of the extra length of the rocker
box). Using the 5/16" drill bit and the ground board as a template,
drill through the bottom of the Rocker Box. Remove the ground board. Use
a 1/2" drill bit to make this hole larger on the ROCKER BOX ONLY. Make
sure you drill perpendicular to the bottom board. Have a friend site for
you.
Leave the ground board's hole at 5/16."
-
Use the 1/2" drill bit to enlarge the hole in a vinyl record. Have
someone hold the record down while you drill or it may ride up on the
bit.
-
Place the ground board feet down on the floor (or table). Place the
vinyl record on top and line up the holes. Place the Rocker Box on top
and line up the holes. Insert the lag screw with its washer and screw it
in with a socket wrench. Make sure the lag screw goes in straight.
Tighten the screw until it is snug and then back it off a bit. The
Rocker Box should swivel smoothly on the ground board.
If you cannot find a vinyl record, then glue (and/or nail) a piece of
glossy Formica to the bottom of the rocker box.
-
Attach cradle boards. The cradle boards should be positioned so that
the tube will not hit the bottom of the rocker box when the telescope is
vertical. You should balance the tube in the tube box and THEN attach
the cradle boards.
Back to top
|