
building a dobsonian telescope - using the telescope
 |
|||||||||||||||||||
VIDEO QUICKLINKS
"Making the Spider Video"
Time (1:54)
"Tailgate"
Time (1:57)
"Focal Length of Mirror "
Time (1:30)
"Mounting Blocks"
Time (1:35)
There are three parts to the finished telescope:
-
Telescope Tube
- Making the spider
- Eyepiece Holder
- Making the Tailgate - Rocker Box/Ground Board
- Tube Box
- Inserting Mounting Blocks
- Finding Focal Length of Mirror
- Positioning Eyepiece and Spider
- Using the Telescope
Positioning the eyepiece and the spider
Once you have the focal length of the mirror you will need to determine the position of the eyepiece and the spider. The purpose of the spider is to reflect the light from the primary mirror out to your eye. You want to position the spider so that the reflected focal point hits your eye. For a detailed mathematical explanation of this see Eric Hooper's notes on Dobsonian telescopes.

Note: When you bend the light with the secondary mirror, the total focal length distance does not change. So, the total distance from the front of the primary mirror to your eye is the focal length.
First subtract the radius of the tube from the focal length. If you put the primary mirror at this distance from the front of the primary mirror, your eye would have to be flush with the telescope tube to focus. This is not very practical so you will want to subtract the length of the eyepiece holder from the measurement.
focal length - tube radius - eyepiece holder length= distance b
Determine the distance from the back of the tube to the front of the mirror. This will vary depending on how accurately the mounting blocks and tailgate were placed in the telescope. Add this distance to distance b.
distance b + distance from end of tube to front of mirror = final eyepiece distance
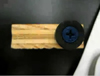
Measure the final eyepiece distance from the end of the tube and mark carefully. Remove the primary mirror before drilling the eyepiece opening so that the mirror is not damaged. Use a door hole drill bit to drill a hole for the eyepiece on the spot that you marked. Make sure the eyepiece is positioned in a way that makes viewing easy (i.e., off to the side or on top, not on the bottom).
Position the eyepiece holder in the hole (push it through from the inside) and use small screws to secure it in place.
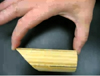
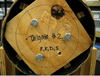
You will want the spider centered in the tube and placed so that the entire primary mirror is visible in the center of the spider. Have the students figure out how to center the spider (i.e., determine the length of the three legs) and cut the legs down. The main source of error here is that students tend to measure diameter from the outside of the tube. This works for positioning the eyepiece, but does not work for cutting the spider down to size. Measure diameter from the inside of the tube and mark the legs. Be VERY careful when you cut to cut on the OUTSIDE of your mark. It is MUCH easier to sand a leg down than to try to add wood back if it is cut too short. The small hand saws work well for this.
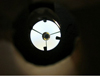
Position the spider opposite the eyepiece holder so that you can see the entire primary mirror when you look straight through the eyepiece holder. Once the spider is positioned well, secure it with a little wood glue.
home | field activities | semester project | course information