
Bubble Festival
Amy Hazelett
Monica Vargas
| Description |
| Concept Map |
| Assessment Plan |
| Rubric |
| Calendar |
| Resources |
| Lesson Plan 1 |
| Lesson Plan 2 |
| Orientation Video |
| Clinical Interviews |
| Modifications |
| Elementary Science Methods Home |
5E Lesson Plan # 2: Bubble Technology and Bubble Colors
AUTHOR'S NAME: Amy Hazelett
TECHNOLOGY LESSON: No
DATE OF LESSON: Week one - Thursday
LENGTH OF LESSON: One hour or sixty minutes
NAME OF COURSE: 1st Grade Science
SOURCE OF THE LESSON: Bubble Festival GEM Guide
TEKS ADDRESSED:
- Science TEKS:
- 1.2 (B) Plan and conduct simple descriptive investigations.
- 1.2 (D) Construct reasonable explanations and draw conclusions.
- 1.2 (E) Communicate explanations about investigations.
- 1.3 (C) Explain a problem in his/her own words and identify a task and solution related to the problem.
- 1.4 (B) Record and compare collected information.
CONCEPT STATEMENT:
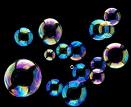
A bubble consists of molecules of water and soap. Gas is located inside the thin skin of liquid and the outside forming what we call a bubble. Bubbles have color because of the reflection of white light, which contains waves of different colors that shine on the bubble. When a bubble is about to pop, the skin of the liquid or wall of the bubble is so thin that the two sets of waves overlap, resulting in the cancellation of the color seen. This is called interference and it appears that the bubble is white during this stage. Elements of light and color can be discovered and applied to future concepts of physics, while learning about the color spectrum.
Topology, exploration of the geometrical properties of various shapes, substances, and figures, can be found through the experimentation of creating objects to make bubbles. Practicality and real life application are learned through inventing tools to make different types of bubbles. Surface tension, elasticity, soap solution, materials, and shapes are factors in the technology of bubbles.
PERFORMANCE OBJECTIVES:
Students will be able to:
- Predict when a bubble will pop.
- Tell how old a bubble is.
- Classify bubble colors and patterns.
- Identify materials and tools that create bubbles. (ex: A spoon cannot make a bubble but a mesh screen can make a bubble)
RESOURCES:
- Water*
- 2 one-quart containers of Dawn and Joy dish-washing liquid*
- 2 cups glycerin*
- 1 or 2 packages of paper towels*
- 150 drinking straws
- 2-4 five-gallon buckets for mixing bubble solution
- 1 empty one-gallon container
- 1 one- or two-cup capacity measure
- 3 or more squeegees
- 1 plastic squirt bottle
- 8 cottage cheese-style containers about 16 oz. each
- dish pans for clean-up drop cloths, butcher paper, and/or a stack of newspaper to absorb spills
- access to a laminator
- file folders to make signs for tables
* Ingredients for bubble solution
Bubble Technology - (needed for this specific activity)
- 2 Dish Pans
- At least 15 pieces of “junk” to use for bubble-makers, such as strainers, tin cans, protractors, paper, mason jar lids, string, drinking straws, tea ball, rubber stoppers with holes, flower pot, funnels, strawberry baskets, plastic rings from a six-pack, medicine droppers, rope, paper cups, Styrofoam cups, various mesh screens, washers, rubber bands, toilet paper, paper towel rolls, aluminum foil, wire of different gauges, and springs.
- Important to include items that will not work like spoons or cups.
Bubble Colors - (needed for this specific activity)
- 1 black or brown plastic trash bag (about 2’ by 3’)
- 8 pieces of tagboard (approx. 8.5” x 11”)
- 1 roll of masking tape
- 1 or 2 cottage cheese containers per table
- 1 pair of scissors
SAFETY CONSIDERATIONS:
- Make sure students know not to drink the solution or put it in their mouth.
- Discourage students from putting their mouths directly on objects.
- Instruct them how to blow a bubble, so they do not inhale or ingest the solution.
- If soap gets in a student’s eye, inform them to blink, do not rub them. (If irritation continues have the student go to sink, wash their hands, and splash water in their eyes.)
- Have towels, newspaper, and other items readily available for spills or excess foam to prevent slipping and falling.
- Do not run or even walk fast around the room.
- Solution stays in the bowls and splashing is not allowed for similar reasons of causing spills.
SUPLEMENTARY MATERIALS, HANDOUTS:
- Signage with guided instructions to be laminated and placed at each station where activity will take place can be found:
- On page 77 and 78 for Bubble Technology Activity
- On page 83 and 84 for Bubble Colors Activity
LESSON
Engagement |
Time: 5 to 10 minutes_ |
|
What the Teacher Will Do |
Probing Questions |
Student Responses Potential Misconceptions |
The teacher will have students gather closely together on a carpet or small area. Teacher will then show the students a traditional bubble container with a blow stick and ask what it is. Next, a volunteer will come to the front and blow some bubbles while the teacher asks probing questions. |
1. Are there any other ways to make bubbles besides using the blow stick? Can you name any? |
1. Yes there are other ways to make bubbles. You can use straws. (Students will then list other possible tools like this.) Possible misconception: You can use anything round that has a hole to make a bubble. |
2. Do bubbles have color? If so, why? |
2. Yes, bubbles have colors. Possible Misconceptions: There is color in the soap. Or everything has a color. [Bubbles have colors because of the reflection of white light.] |
Exploration |
Time: 30 minutes_ |
|
What the Teacher Will Do |
Probing Questions |
Student Responses Potential Misconceptions |
Explain that there are two activities they will be doing today. The first is called bubble technology, where they will experiment with different objects to see what makes bubbles. The second is called bubble colors, where they will observe and discover the colors and patterns of bubbles. |
1. What is the first thing you are going to do at your station? 2. What are you doing at the bubble technology station? 3. What are you doing at the bubble color station? |
1. Blow bubbles. [Read your sign, then do what it says] 2. We try to blow bubbles. [Learn what objects allow the blowing of bubbles.] 3. We are looking at colors on the bubbles. [And also classifying the patterns.] |
Divide the class into groups of four and assign them to a station. There will be three bubble color stations on one side of the room and three bubble technology stations on the other side. After twenty minutes at one station a bell will be rung and the students will switch to the other station on the other side of the room. Also I will explain the signs that are on the table that give them guided instruction. They will go to their station, read the sign aloud in unison with a partner, and do what the sign says or depicts. As the students explore, the teacher should be walking around the room, asking probing/focusing questions and offering students help. |
4. What do you do when you hear the bell ring? 5. Can you use that object in a different way to make a bubble? 6. Can you tell how old a bubble is by its color? |
4. Move to the station that we haven’t done yet. 5. I can wave the object in the air instead of blowing into it. 6. A bubble doesn’t have an age. It’s not alive. [A bubble’s age can be seen by the color it emits. If it is white, then it is older and probably fixing to pop.] |
Explanation |
Time: 10 minutes |
|
What the Teacher Will Do |
Probing Questions |
Student Responses Potential Misconceptions |
After thirty minutes of exploration, the students will dry off. They will return to their desks to document their findings in their personal journals for the final twenty minutes. Students can draw or write in their journals as the teacher rotates around the room asking probing questions. |
1. Did the bubble have colors? If so, what colors? 2. Were you able to find how old a bubble was? 3. Did anything happen when you blew on the bubbles in the color station? Why? |
1. Yes the bubble had a lot of colors. They swirled around the bubble. 2. A bubble doesn’t have an age. [A bubble’s age can be seen by the bubble turning white.] 3. The colors moved around because the air you blew on the bubble. [As the bubbles move from the air, light reflects off of the bubble differently, producing the shift in colors.] |
Explain what white light is and show them a prism so that they can visually see white light in action, then relate it to the bubble colors. |
4. Is white light reflected in a bubble? |
4. No, because the light is white. It doesn’t have color. [Yes, white light is reflected in a bubble because white light is the spectrum of colors.] |
Discuss which objects did or did not make bubbles and why. |
5. What did we find is the best tool to make a bubble? Can you draw it in your journal? 6. Why do you think this bubble maker worked the best? |
5. I liked the straws because you could control how big you blew a bubble by how slow or fast you blew into the straw. 6. Bubbles like wet objects and I was able to get the whole object wet. They also like for air to be able to blow into them and these objects allowed this. |
Elaboration |
Time: 5 to 10 minutes_ |
|
What the Teacher Will Do |
Probing Questions |
Student Responses Potential Misconceptions |
As the students have seen what does and does not create a bubble, ask the students to draw/create a machine that makes a bubble big enough to carry them inside. |
1. Why would your machine work? |
1. I was able to make the biggest bubbles with the large wire, so I combined more wire to make a bigger opening to make a bubble. |
To add real world application, the teacher could also discuss color in other objects like the rainbow. |
2. Is there a similarity between a rainbow and a bubble? |
2. No, a rainbow is in the sky and doesn’t have soap. [The similarity between a rainbow and a bubble is how we can see the color.] |
Evaluation |
Time: 5 minutes |
|
What the Teacher Will Do |
Probing Questions |
Student Responses Potential Misconceptions |
Explain to the students that the next day we will be talking about the discoveries they have made in groups and as a class, so they need to document their findings in their journals as best as they can. |
1. Were you able to document what colors you saw? 2. Can you write or draw the stages of a bubble’s age? 3. Did the bubble loose color because it was old? |
1. I made this bubble then colored how I saw the patterns. 2. I made four different bubbles and showed how the bubble lost color as it got older. 3. Yes, it lost color because it got old, just like a person’s hair turns white as they get older. [The bubble turns white because the soap film is thinning and light is not reflecting off of it, so that colors can be seen.] |
Also, that the teacher will be checking their journals periodically to see what they have discovered (for mastery of the performance objectives). |
3. How did you draw/write, which objects made a bubble? |
3. I put all the objects that couldn’t make a bubble on this page and the objects that could on this other page. |