Name:
Curt Wyman
Title of lesson: Telescope Construction
Date of lesson: March 29 and April 5, 2005
Length of lesson: 3 hours
Description of the class:
Grade
level: Algebra 2
Sources for the lesson:
Making
Your Own Telescope,
Claire
Hadgin and Betty Stennett
Holt Physics textbook, chap 14
AISG
Physics IPG’s
Texas
Essential Knowledge and Skills for Science
Consultations with E. Hooper, G. Dickinson & J. Pierson
TEKS addressed:
The
Lesson: Final Construction of the telescope
I. Overview
In this lesson, students
will:
0.
Engagement 1:00
– 1:10
1.
Measure the focal length of the primary mirror 1:10
– 2:10
2.
Determine the basic two mirror structure of the telescope 2:10 -
2:30
3.
Calculate the location of the hole for the eyepiece 2:30
- 3:00
4a.
Figure out how to center the spider and place it in the tube 3:00 – 3:20
4b.
Align the primary mirror 3:20
– 3:45
5.
Demonstrate a working telescope 3:45
– 4:05
II. Performance or learner outcomes
The students
will be able to:
1. Define and explain Focal Point and Focal Length for
a curved mirror.
2. Define the basic parts of a reflecting telescope
and explain it operation.
III. Resources, materials and supplies needed
Five E Organization: Part
1, Focal Length Measurement
Teacher
Does Student
Does
|
Engage:
Time: 1:00 PM – 1:10
PM
Teacher will review
telescope costs and emphasize care.
UTeach is a teacher
training program at the University of Texas in the Natural Science
department. It’s just for math
and science teachers.
We are building
telescopes with four Algebra classes at Stoney Point HS this week and four
more next week. We’re building at Stoney Point this semester. Last semester we built at McNeil – I
just didn’t want you to do to the wrong school! J
Last semister, UTeach
students built telescopes with 8 classes at McNeil HS.
Only 2 or three of the
telescopes were completed and functional at the end of the classes.
You learned about optics
and the math of optics this morning.
This afternoon, we’re
supposed to put that knowledge to work and build a telescope. A good telescope. It’s important to me that we get ours
working so that you can see how it works.
It’s non-trivial
work. You will have to work hard
and be precise in order to finish on time and put the telescope together.
Telescope Economics:
6 inch home reflecting
telescope: $1000 up
Primary mirror, 6
inch: $100
Eyepiece: $25
Learning Experience:
The teacher will ask the students what
they know about telescopes. The teacher
will ask students what pieces are essential to a telescope.
|
|
|
Explore:
Time 1:10 PM – 2:10
PM
Part 1: Measure the focal length.
The teacher will remind
the students of their lessons on Focal Length and Focal Point from the
morning sessions.
What is the formula for
the focal length? You might have to review why they need to divide the
radius of curvature by two.
F = r/2
The students will be
told that they do not have parallel beam light for the Focal Length
measurement and will use a Flashlight.
We will be working in
inches for this exercise because the mirror is specified in inches.
Hint: Normally light rays from an object
strike the mirror at various points on the mirror and the ray at each point
makes a different angle with the
mirror. Look for a place to put the object (flashlight) where the angle that
each ray makes with the mirror is always the same, no matter where on the
mirror a light ray strikes it.
You have a work sheet
with a scaled drawing of a convex lens.
The class will be
divided into 6 groups of about four students each. Three of the teams will use the actual primary
mirrors. These will be
identified by numbers on the back so that we will be able to have the correct
focal length for the actual telescope construction.
The other three teams
will have small concave mirrors to perform the Focal Length measurement
exercise.
Make sure to reserve those mirrors (you did that last Friday right??)
Each team will measure
the focal length of both a large and a small concave mirror. When they finish with their first
mirror, they will trade with another group and measure the focal length of
the other size mirror.
The teacher will walk
around and observe the activity and answer questions.
|
Students move into their
groups and sit at their lab table.
The “Materials Person”
gets the equipment while the other students read the instructions.
The students will work
as a team to measure the Focal Length of the mirror as an inquiry.
Their lab sheets will
require drawings showing the Focal Length calculation.
|
|
Explain:
Time: 1:00 PM – 1:10
PM
The teacher will ask one
of the groups to explain their procedure.
You can find the radius
of curvature of a convex mirror by shining a flashlight on the mirror and
having the image reflected back onto a piece of cardboard right next to the
flashlight.
Start close to the
mirror and move away from the mirror until the image comes into sharp
focus. At that point the light
rays are reflecting off of the mirror at 90 degrees and will form a sharp
image. This will occur at the
radius of curvature of the mirror.
|
|
Five E Organization: Part
2, Determine Telescope Design
Teacher
Does Student
Does
|
Engage:
Time: 2:10 PM – 2:15
PM
Teacher will ask:
What is the focal length
of your telescope mirror?
How long is your
telescope?
So where is the focal
point of the mirror on the telescope?
Ok. In order to use the telescope
effectively, you must be able to look at the focal point of the
telescope. That is where the
image of the object that you are looking at will appear. Normally we use an eyepiece similar
to a microscope eyepiece to magnify the image at the focal point.
Do you see any problems
with the location of the focal point?
Great question.
Your next mission: Decide how to solve this problem and
find a way to place the eyepiece so that it can be used effectively.
|
The students will
answer: 48 inches.
About
48 inches.
Right at the front end.
Yes, my head would block
the light coming in if I tried to look at the focal point.
|
|
Explore:
Time 2:15 PM – 2:30
PM
The class will be
divided into 6 groups of about four students each.
One team will use the
actual telescope and primary mirror.
Two teams will use spare primary
mirrors and extra sonotubes.
The other three teams
will use the small concave mirrors and small 3 inch diameter tubes. Do you have
these tubes or does UTeach need to purchase them?
After 5 minutes of group
discussion, the teacher will re-convene the class and discuss the findings.
|
Students will be in
their groups during the class discussion.
The students will work
as a team for five minutes to determine how to access the focal point.
|
|
Explain:
Time: 2:20 PM – 2:30
PM
The teacher will ask one
of the groups to explain their idea.
The teacher will ask the
other groups if they think the first group’s idea will work. Other ideas will be discussed until a
side eyepiece concept is developed.
This is nice, letting them come up with the
need for a side eyepiece instead of just telling them how to do it.
|
|
|
Extension/Engagement:
Time: 2:30 PM – 2:35
PM
What is the obvious
question that comes next?
Anyone know the first
rule of carpentry?
|
Where do you put the
hole?
Measure twice cut once.
|
Five E Organization: Part
3, Calculate the Eyepiece Location
Teacher
Does Student
Does
|
Explore:
Time 2:30 PM – 2:50
PM
The class will be
divided into 6 groups of about four students each.
Hand out the Eyepiece
hole worksheet.
The teams will take
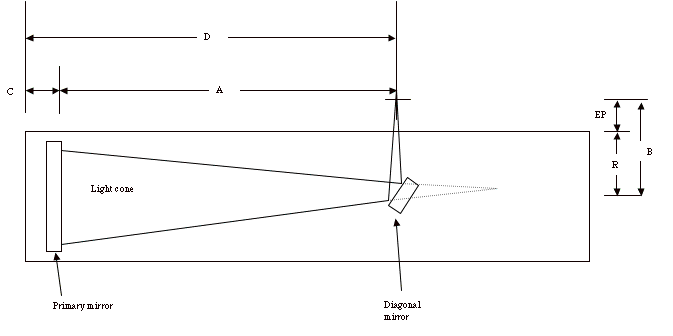
turns measuring dimension C on
the actual telescope.
They will make the other
measurements from the extra sonotubes.
When all of the groups
have completed their measurement, we will come together as a class and
compare notes.
|
Students will be in
their groups during the class discussion.
The students will work
as a team for twenty minutes and calculate the distance from the end of the
tube to the hole for the eyepiece.
|
|
Explain:
Time: 2:50 PM – 3:00
PM
The teacher will compile
the hole calculations from the groups onto the blackboard. The class will discuss any
discrepancies. Once the location
is finalized, the teacher will ask Hank (Hank
probably wont be there but one of us will) to cut the hole and install
the eyepiece mount.
|
|
Five E Organization: Part
4, Install the two mirrors
Teacher
Does Student
Does
|
Explore:
Time 3:00 PM – 3:30
PM
Two of the groups, the
Spider team, will work on preparing and installing the spider and the two
other groups, the Mirror team will work on installing and aligning the
primary mirror.
Hand out the Spider
worksheet and the primary mirror alignment worksheet.
The spider has three
legs. They must be trimmed to
place the diagonal mirror in the exact center of the telescope.
It is better to cut the
legs a tad long so that the spider fits in the tube snuggly.
The primary mirror will
be placed in the back end of the telescope and the base plate will be screwed
in.
|
The Spider Team will
mark the spider legs for cutting so that it will be centered and report to
the teacher when ready to cut.
The Mirror Team will
find the center of the primary mirror and notify the teacher when they are
ready to apply the sticker.
The Mirror Team will
perform the initial alignment by adjusting the bolts at the base of the
telescope.
The Spider Team will
install the spider next to the eyepiece hole.
Final alignment will
occur by the Mirror Team after the spider has been installed.
|
|
Explain:
Time: 3:30 PM – 3:40
PM
Each of the teams will
give a short report to the other team regarding their respective activities.
|
|
Five E Organization: Part
4, Install the two mirrors
Teacher
Does Student
Does
|
Extend/Elaborate
Time: 3:40 PM – 4:00
PM
The eyepiece will be
installed and the telescope will be moved near a window. A distant object will be observed
with the telescope and the students will each be given a chance to look
through the telescope. The lesson sounds great – the organization is smooth and
facilitates them discovering how telescopes work on their own instead of
being spoon-fed. Well done.
|
|
Group #: _________
________________ ______________
LAB TITILE: PART
1, Focal Point of a concave mirror
PURPOSE: To measure the Focal Length of our mirror.
MATERIALS: Large mirror, small mirror, ruler, tape measure,
flashlight, white cardboard.
INTRODUCTION: This activity demonstrates the mathematical
properties of circular mirrors:
Focal Point, and Focal Length
DIRECTIONS:
You have a flash light and
a parabolic mirror. You cannot
accurately generate parallel light rays that will give you a good focal
point. You discussed this in the morning
lesson.
Find the focal length of
your mirror in inches. You have 30
minutes.
Your results must include
a drawing of the mirror, the light rays, the Focal Point of the mirror and the
focal length. Use the attached
skeleton drawing.
Once you find the method,
it will take two people to actually make the measurement. Divide your team into two pairs and
have each pair make a measurement.
If the two do not agree, take a third.
THIS IS A CRITICAL
MEASUREMENT!
The measurements and the
calculation of the Focal Length must be shown.
Large lens: Focal Length #1 _____ FL #2 ______ FL #3________
Small
lens: Focal Length #1
_____ FL #2 ______ FL #3________
Group #: _________
________________ ______________
LAB TITILE: Telescope Structure
PURPOSE: To learn about how reflecting telescopes are made
MATERIALS: Telescope components.
INTRODUCTION: How can
we design our telescope so that we can observe the focal point of the lens?
DIRECTIONS:
PART 2,
Telescope Structure
In order to see the
magnified image with your telescope, you have to get your eye close to the
focal point of the lens. A short
eye piece like that used with a microscope will also be used to further magnify
the image.
How will you install the
eyepiece so that you can see the focal point clearly?
You have 15 minutes.
Your results must include
a drawing of the telescope construction proposal including the path of light
from the source of the image off of the lens and into an observer’s eye. Approximate dimensions must also be
shown on the drawing.
It is not necessary to
worry about the details of the eyepiece installation.
Group #: _________
________________ ______________
LAB TITILE: Telescope PART
4a: Install the secondary mirror.
PURPOSE: Determine the leg length for the spider and install
it.
MATERIALS: Spider, ruler, wood glue, pencil and paper.
INTRODUCTION: **
Notify the teacher when you are ready to cut **
DIRECTIONS:
1. Determine how long each leg of the spider should be
in order for the diagonal mirror to be in the exact center of the tube.
The
legs should be just a bit long, so that the spider will fit snuggly in the
tube.
Make
your measurements and mark the legs for cutting. Have one student notify the teacher when you are ready to
cut.
Be
prepared to justify your measurements.
2. Install the spider in the
telescope. Place it in the center
of the tube and slide it down until it is directly opposite the eyepiece hole.
Group #: _________
________________ ______________
LAB TITILE: Part 4b – Install
and align the primary mirror
PURPOSE: To learn about how reflecting telescopes are made
MATERIALS: Primary mirror, telescope, center marker sticker, screws, socket wrench, misc
supplies.
INTRODUCTION: THE PRIMARY MIRROR IS A PRECISION OPTICAL
INSTRUMENT THAT IS VERY EXPENSIVE.
***
BE VERY CAREFUL WITH THE MIRROR ***
DIRECTIONS:
1. It is necessary to mark the center of
the mirror with a paper re-enforcing ring to facilitate alignment during the
final construction.
Determine the center of
the mirror.
When you are ready, have
one student notify the teacher that you are ready to mark the mirror center.
2. Place the primary mirror in the back of
the telescope against the rubber stops inside of the tube.
Place the wooden base
behind the mirror and attach it to the tube with the wood screws that are
provided.
The large bolts in the
base plate can be turned in order to align the mirror.
The mirror should be
adjusted to that when you look into the open end, your eye will be appear at
the center of the mirror, in the center of the tube.
This is not a simple
process and will require time and patience.
Start by gently turning
the bolts until the mirror is resting against the rubber stops. Reach in with your finger and touch the
edge of the mirror so you can tell when it stops jiggling.
Now you are ready for
alignment.
Have one person at the
open end of the telescope to see the effects of the bolt adjustments.
Turn each bolt a little
bit tighter and determine if the alignment gets “better” or “worse.”
Continue in this way to
get the mirror centered.
3.
After the spider has been installed, the final alignment needs to be made.
Look through the eyepiece
hole and you will see the diagonal mirror. You should see the center marking on the primary mirror in
the diagonal mirror.
Adjust the bolts in the
base plate so that the center of the primary mirror is in the center of the
diagonal mirror.